The Red Panther - Build photos Bicycle Caravan - Tubes, connectors, wheels, plates and a trial tarp
Send a messageLatest news in the timeline  RSS
The Red Panther

Build photos Bicycle Caravan - Tubes, connectors, wheels, plates and a trial tarp

+
Construction started early 2020. With just some tubes roughly half the size my bed.
+
Space for myself and for the wheels. Makes sense.
+
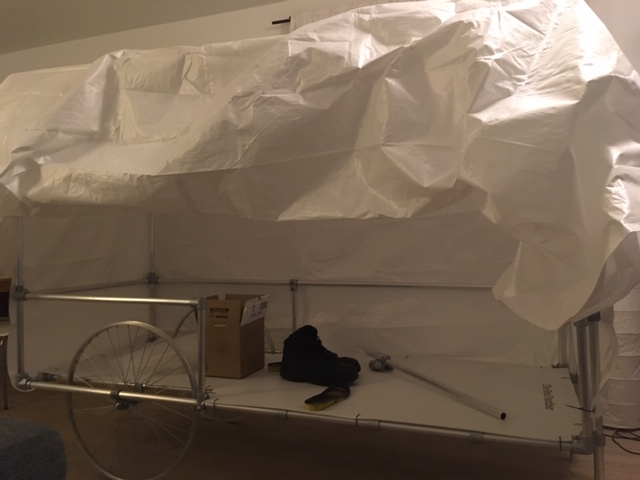
Aluminum tubes and cast iron tube connectors. Most people make static furniture with these readily available materials, let's try to make something more 'dynamic'.
+
Next step: add wheels.
+
Still only using hand tools. Everybody can do this.
+
Aha moment: the moment it was clear that this tube connector could hold the wheel axle. Before this, it was just an idea that I wanted to try out.
+
Can I get the wheel straight? What happens if it's not completely straight? What happens when I put my whole weight on this construction? All kinds of questions...
+
Some people watch television from their couch.
+
Some early sketches and notes. I don't treat these as law, only as rough guidance in the beginning.
+
Plans changed. I needed this half tube at the back to create some kind of fender. First, I wanted to make a wheel arch from some sturdy plastic feeding barrel.
+
It's starting to get in shape.
+
Around twenty kilos. Not too heavy and still within limits, but I need to keep an eye on the weight.
+
Luckily this 'corrugated plastic' (or 'channel plate' as we call it) weighs nothing. For strength and support I first add this extra layer on the bottom.
+
What's in a name.
+
Measure twenty times, cut once.
+
Seems to fit.
+
The plate is held in place by some tie wraps / ty raps / ta teh... things.
+
This concept bicycle caravan has served as a table top for months.
+
And it also sparked joy from time to time.
+
Bought some cheap plastic tarp to try and fit. This way I could make some mistakes before I buy the quality tarp that I had in mind.
+
Yes, to have this in your living room was as depressing in reality as on the picture.
+
First attempt at creating some kind of drawbar. It worked and was very sturdy, but also too heavy and cumbersome. I wanted to use the drawbar as legs, so I had to remove the drawbar every time. Not fun.
+
The tube connectors (made of cast iron) weigh way more than the aluminum tubes. Not fun to have all this weight in the front.
+
The trial tarp cut to size. I'm getting some feel for the final dimensions now.
+
The roof is an important part of this tiny house, because it also works as the shell for the vehicle.
+
Walk around, look carefully, measure twice, look again... try to get some feel for the cuts, folds, eyelets and rope.
+
The roof is also the shell. Now I have some feel for the dimensions behind my bicycle.
+
It's a trial tarp so I try things. Strengthen it with some duct tape, prevent tear in by punching a hole. I learned valuable stuff here.
+
Trying the shape, the materials, the methods, etc.
+
Luckily I tried the eyelets first. The special tools for doing this were slightly too big for the eyelets, that's why some failed.
+
Still only hand tools. The white plate on the left is to prevent the circle cutter from getting damaged on the concrete. And I need the concrete underneath because it doesn't make the hammer 'jump' back after each hit (like on any other surface I tried).
+
I like these things. I already made a curtain for my kitchen with these eyelets (also called 'grommets'). I like how they look, the strength, the relative ease with which they can be attached to all kinds of fabric.
+
First attempts at stretching the tarp with some rope.
+
Regular view from my couch for months.
+
And sometimes I had to access the bottom. The frame is still pretty light to handle.
+
Bicycle in the living room. Going Dutch.
+
The wedding. Put a ring on it.
+
Calculating the weight on the drawbar. That is the weight that constantly pushes the back of my bicycle down. I figured I can handle a high overall weight, as long as the weight on the drawbar is not too high.
+
Hardly visible, but I moved the wheels forward in the frame a little bit. To control the weight on the drawbar.
+
The frame needed to be right before I started measuring and cutting the next set of plates. I'm happy I moved the wheels forward and I'm contemplating moving them even more.
+
I can get it out of my living room and onto the street, but I want moving this thing between my living room and my shed to be easy.
+
Does this look easy to you? It isn't, I can tell you. To be continued...
+
First, let's check the new plates. Also corrugated plastic, just like the floor plate.
+
I couldn't find these plates anywhere. I eventually found out the online print shop was cheapest and most easy with the size.
+
So... since I'm ordering from a print shop, I might as well add some prints.
+
And since this thing is called The Red Panther...
+
... you get the idea. Just look at the pictures.
+
And a picture of a digitally connected world.
+
The wheels are visible in the dark, nice.
+
Since the plate was cut wrongly by the print shop - new one is coming - and I could keep this one, I decided to cut and tape this one, instead of folding. Figuring out where to cut with this scale model.
+
Cutting along the channels is easier than through them. I used some old piece of card board as a ruler. #workwithwhatyouhave
+
I wanna see more panthers on da streetz.
+
Getting an idea and feel for the assembly of the plates.
+
The tape is definitely workable. And also strong. I just have to see if the same setup looks better if it's only folded, so without tape. But I'm getting ahead of myself here.
+
Never thought I was going to like duct tape. But it really is strong and handy stuff.
+
On the inside the duct tape makes it look sharp and properly square.
+
On the outside... I'm not so sure. It's hardly visible, but the tape is not straight, and it annoys me. Conclusion: workable for now.
+
Get outside on my bike during the day. Work inside on the bicycle caravan project by night.
+
Using little tricks to work with the plate. I want to attach a tailgate that can drop down completely, so I need more freedom of movement there. I give it exactly the same space everywhere with the use of another piece of plate
+
Exactly the thickness of the plate as a divider, this will do the trick.
+
Remove the little strip and the resulting gap is exactly what I need.
+
Tailgate attached. It can close the back side, or fully drop down to unload stuff without the risk of the plate snapping.
+
Also attached these flaps in front of the wheels. They work as mud flaps while riding, and as windbreakers when camping. Besides, forming this box equals deforming a panther.

More photos in Part Two of this series.

Videos on YouTubePatreon
You might also like: http://drukwerkdeal.nl (http://drukwerkdeal.nl) | Or see all shared links